The MAP sensor is one of the most critical sensors when calculation the required amount of fuel. Two MAP sensors are suppported, the standard 250kPa and the high boost 400kPa version.
Unlike most other engine management units the manifold pressure sensor is integrated onto the main circuit board. In most cases the only thing left to do is to run a pneumatic wire from the Genboard module to the intake manifold.
The standard is for the MAP sensor to be placed on-board, but it can be located outside of the Genboard module. In the case you would locate the MAP sensor outside of the case, some alternate wiring is required. This wiring can be requested when ordering your Genboard module, or can be done by you by simply running an air-wire from the MAP signal lead to an unused EC connector pin.
There is very little configuration for the MAP sensor, even though it is arguably the most important sensor in the system.
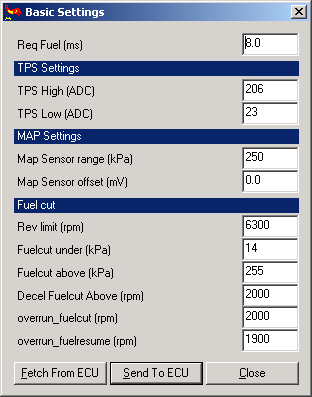
First the sensor most be configured in the dialog 'Basic Settings', which can be found be selecting 'Settings->Basic Settings' from the main menu (see Figure 9.16, “MegaTune - Basic Settings dialog, configuring MAP sensor” .
-
MAP Settings
-
MAP Sensor range
Currently two different MAP sensors are supported, the 250 kPa and the high boost 400 kPa. If the 250 kPa version is fitted the number 250 must be entered in this field. In case the 400 kPa version is fitted the number 400 must be entered in this field.
-
MAP Sensor offset
If data from a nearby weather station or airport is available this field can be used to fine tune the MAP sensor. Calibrating the MAP sensor is described in more detail in Section 9.5.5, “Calibrating - TODO” . Beware that the internal resolution of this value is 0.25 kPa, the dialog box however only displays on decimal.
-
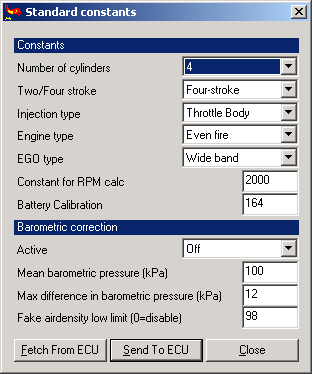
Secondly is possible to configure a couple of more advanced parameters for the MAP sensor - barometric correction. In the dialog 'Standard constants' which can be found be selecting 'Settings->Constants' from the main menu, it is possible to configure the barometric correction (see Figure 9.17, “MegaTune - Standard constants, configuring MAP sensor” ).
-
Barometric correction
- TODO decribe the benefits of barometric correction.
-
Active
In this drop down box it is possible to either enable or disable this feature.
-
Mean barometric pressure
In the unfortunate event of sensor failure a sane fallback value can be configured, primarily usefull as a limp-home aid. A sane value is 100, but it can be a good idea to use a higher value to provoke a higher mixture - preventing engine damage due to lean mixture.
-
Max difference in barometric pressure
The MAP sensor is considered to be faulty when it's output is greater than 'Mean barometric pressure' minus 'Max allowed difference in barometric pressure' or less than 'Mean barometric pressure' plus 'Max allowed difference in barometric pressure'. If the MAP sensor is considered faulty the value configured in 'Mean barometric presure' will be used instead.
-
Fake airdensity low limit
- TODO
-
Most people don't bother to calibrate their MAP sensor more precisely because tuned VE values compensate for even significant errors, but getting air pressure data from a weather station or nearby airport is useful.
Even though the MAP sensor is high quality and very precise it is recommended that it is calibrated. It is very important that the parameter 'MAP Sensor range' has been configured (see Section 9.5.4, “Configuration - TODO” ) correctly before it is calibrated.