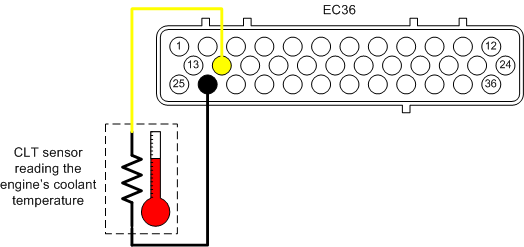
Genboard v3 uses a GM CLT sensor as standard, but can be configured to use any NTC type resistive sensor. The GM CLT sensor is available in the WebShop, and many other places for very cheap.
Most vehicles have a coolant temperature sensor mounted somewhere in the cooling system, in most cases it can be used by the Genboard module. If the stock sensor is incompatible it should be replaced with a compatible one at the same location.
The coolant sensor must be wired up according to the diagram below.
- EC36-pin14 Signal
- EC36-pin26 Ground (also ground to the engine block close to sensor)
When starting an engine the amount of injected fuel must be corrected in several ways. The engines coolant temperature is one of the key parameters. This section describes the coolant temperature sensors role during the engine start procdure.
It is highly recommended that the coolant temperature sensor is calibrated correctly (see Section 9.2.5, “Calibrating - TODO” ) before any configuration is made.
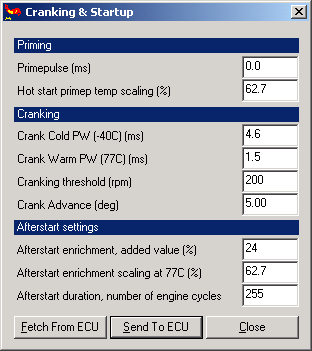
The dialog Figure 9.9, “MegaTune - Cranking and Startup dialog” is accessible from the main menu by selecting 'Settings->Priming,Cranking,Afterstart'.
-
Priming
When the ECU is powered up it is common to inject some fuel to aid starting, this is called priming. Priming is carried out before the engine starts to rotate. The amount of fuel injected is scaled according to the engines coolant temperature, since a warm engine needs less (if any at all) priming than a cold engine.
-
Primepulse
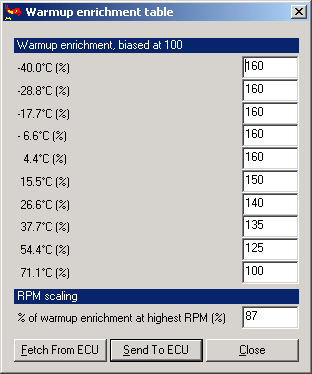
The 'Primepulse' parameter is a critical parameter and sometimes it takes some experimenting to get it right. Enough fuel must be injected for the engine to start, however injecting to much floods the engine and prevents it from starting. When cranking the engine for the first time it is best to be conservative at first and then add more pulse if needed for faster starting. The 'Warmup enrichment table' as seen in Figure 9.10, “MegaTune - Warmup enrichment table dialog” is not used to scale the 'Primepulse', instead the 'Hot start primep temp scaling' value is used.
-
Hot start primep temp scaling
Between -40C and 74C the 'Primepulse' is scaled down linearly with higher coolant temperature to prevent the engine from being flooded. This is due to the fact that the engine requires a richer mixture to start when cold than when it is hot.
-
-
Cranking
When cranking the engine a richer fuel mixture is normally required. This enricment is controlled with the following four parameters.
-
Crank Cold/Warm PW
The 'Warmup enrichment table' as seen in Figure 9.10, “MegaTune - Warmup enrichment table dialog” is not used to scale the the amount of fuel injected when cranking, instead the 'Crank Cold/Warm PW' values are used. The 'Crank Cold PW' and 'Crank Warm PW' values determine the cranking pulselength at -40C and 77C respectively. The ECU does linear interpolation between these two values to determine the needed pulse at the current engine temperature. The pulselength is used when the engine is determined to be in the cranking mode, below 'Cranking Threshold'. During this cranking pulse cycle all injectors will be opened once for every crankshaft revolution.
-
Cranking threshold
The ECU considers the engine to be in cranking mode when the RPM is below 'Cranking threshold'. If the engine passes the configured threshold the ECU considers it in running mode. In most cases engines are cranking between 100-200 RPM, a good starting point is 300 RPM. It is a good idea to test at what RPM the engine is cranking, e.g. by removing the sparkplugs and crank the engine for a short period whilst watching the RPM in MegaTune. If the cranking speed is measured to 350 RPM, raise the 'Cranking threshold' to 400 RPM.
-
Crank Advance
- TODO
-
-
Afterstart settings
After the engine has been started it is often nessecary to run with a richer mixture for a number of revolutions. The three afterstart values control this behaviour. It is possible to configure for how many engine cycles a certin amount of extra fuel should be added. Furthermore the extra added fuel is scaled according to the engines coolant temperature. Depending on the engine setup, these parameters can vary alot and some experimenting is probably nessecary.
-
Afterstart enrichment added value
The enrichment is configured as a percentage added to the fuel normally required. If the engine dies after cranking it likely needs a longer duration or higher percentage enrichment. If the engine cranks and then begins to stumble or load up with fuel, it is likely that the added percentage needs to be lowered or the duration shortend.
-
Afterstart enrichment scaling
The 'Afterstart enrichment added value' can also be scaled with the temperature of the engine. As the engine warms up it most likely neeeds less enrichment
-
Afterstart duration count
The number of engine cycles the afterstart enrichment must be applied is controlled with this setting.
-
After the 'Afterstart duration count' has elapsed the 'Warmup enrichment table' is used to enrich the injected fuel mixture during warmup. When the engine reaches 71C, the fuel mixture is no longer enriched. Almost all engines require some enrichment when they are cold to run properly, but the amount can vary a lot between different types of engines. The dialog Figure 9.10, “MegaTune - Warmup enrichment table dialog” is accessible from the main menu by selecting 'Settings->Warmup Enrichments'.
After the CLT has been configured it is a very good idea to test the sensor. The easiest way to test the sensor is to use three known temperatures.
- Ambient room temperature, use a normal thermometer as reference.
- Boiling water at sealevel should be very close to 100C.
- Ice water, a glass of water stirred with some ice cubes should be very close to 0C.
Connect the Genboard module to a PC with a serial cable and start MegaTune and check the readings.